Tabular Data Validation Using FormCollection and ASP.NET MVC Forms
by Ira Endres on Friday, September 1, 2017
Tabular Data Validation Using FormCollection and ASP.NET MVC Forms
Wow, it has been a long time since our last blog post. At Cosairus we are always working hard to meet our clients' needs and we have certainly been busy writing amazing code and meeting their business goals. The other day one of our developers approached me with an interesting issue: if we have a <table> with rows and columns, how can we present the data, display validation, and save the information back to the database? Typically, presenting tabular data in ASP.NET MVC is trivial using the Razor templating engine, but retrieving the data and displaying validation messages on a per-cell basis can be tricky using a Forms-based approach.
In general, validation can occur in two places: client-side and server-side. Client-side validation has the benefit of providing great user experience and server-side validation provides protection from side-loaded data and more programmatic control of validation rules. Both are important and ASP.NET MVC provides a built-in framework for both styles of validation. AJAX-enabled applications can present validation messaging all on the client-side however Forms applications must rely exclusively on server-side validation when bad input is received. To assist developers, the Razor templating engine is paired with helper extensions that can provide validation summaries and validation messages at the control level that programmatically control the markup.
The Problem
When we introduce a 2D array structure that needs to be validated using Forms, things start to get messy. If the number of columns is known it is easy to populate a list of objects that have the expected properties and use Razor to model bind them. Razor will automatically format the name of all <input> or <select> elements so they correspond with the index and properties of your data. If the number of rows and columns is dynamic, it is still possible to use Razor but keeping up with the input names becomes a headache in the presentation of validation messaging. There are a variety of ways to transmit and receive 2D structured-data, but there are only a handful of mechanisms that have the potential to keep the code base simple, readable, and flexible using MVC without JavaScript.
Programmatic Control of <input> Names
At the transport layer of all HTTP form data, the information is transmitted in the style name=Bob&title=HRH as specified in RFC specifications that have been around forever. When we consider 2D structures represented in this format, there are 2 simple ways to accomplish this: set-based and coordinate-based. A set-based approach might look something like:
r0=My%20Product&r0=Product%20Description&r1=Another%20Product&r1=Other%20Description
Here we treat rows as sets of data with the same name and iterate over the values as interpreted columns. These are easy to work with and can respond to jagged arrays. The coordinate-based approach gives each cell a unique name that corresponds to the position in the 2D array like:
0_0=My%20Product&0_1=Product%20Description&1_0=Another%20Product&1_1=Other%20Description
This approach accomplishes the same goal, but when presenting validation messages for a given table cell, the data is easier to locate because you will know the exact position in the data without having to calculate it which makes this an easier approach to implement.
When we make the choice to control the names of the inputs in ASP.NET MVC we lose the features that the Razor HTML Helpers abstract when we use methods like @Html.ValidationMessageFor(Expression). The developer is then responsible for rendering the markup for the controls, validation messaging, and any additional attributes that the markup requires for the application. Finally, dynamically rendering the control names foregoes the model binding and attribute validation as provided by the DataAnnotations ComponentModel. Fortunately, ASP.NET MVC provides us the tools to hurdle these challenges if we use a little creativity.
<input> Names as Coordinates
Just because we are making a 2D array does not mean we have to use primitive objects for our data. First, let's create an object that represents our table cell so that we can abstract some of the functionality. Each cell will have a row and column position that it should know about. Then the cell needs to have a property to store the string value that is the cells contents. It may be useful at the cell level to know what the row and column names are for presentation purposes. Finally, the table cell should be responsible for formatting the value for the name attribute in the markup.
public class Cell
{
    public int RowId { get; set; }
    public string RowName { get; set; }
    public int ColumnId { get; set; }
    public string ColumnName { get; set; }
    public string Value { get; set; }
    public string Name { get { return RowId + "_" + ColumnId; } }
}
Our view model will be responsible for working with the cell objects for both presentation and validation. Ultimately, this object is responsible for interacting with two sources of data, the FromCollection object as well as your actual data models retrieved from your data source, but first our view model will need to be able to create an empty 2D array that we can use to load the information from these two sources.
Suppose we will be working with a product that comes in different sizes and colors and that we need to manage the prices of each combination. To instantiate an empty 2D structure, we will iterate over the combinations and initialize Cell objects for each. Note: I have elected to use the List<T> class for my 2D array but this could be just as easily accomplished using a Cell[,].
protected List<List<Cell>> GetCells()
{
    List<List<Cell>> array = new List<List<Cell>>();

    for (int c = 0; c < this.Colors.Count; c++)
    {
        array.Add(new List<Cell>());
        for(int s = 0; s < this.Sizes.Count; s++)
        {
            array[c].Add(new Cell()
            {
                RowId = c,
                RowName = this.Colors[c],
                ColumnId = s,
                ColumnName = this.Sizes[s].ToString()
            });
        }
    }

    return array;
}
With the ability to create an empty 2D structure, our view model can load the information from the data source into the structure by iterating over its dataset by calling GetCells() before loading and using the output structure for presentation.
Extracting Coordinates and Data from FormCollection
When the form data comes back from the client we will need to parse the information from the FormCollection instance and load that information into our 2D structure. In this example, the FormCollection property is side-loading the FormCollection object as received from the calling controller. Like our Cell class, we will split the value of the FormCollection key by the underscore character and treat the components as the row index and column index respectively. Using this information, we can target precisely the appropriate Cell to store the data.
public List<List<Cell>> GetCellData()
{
    List<List<Cell>> array = this.GetCells();

    if (this.FormCollection != null)
    {
        foreach (string key in this.FormCollection.AllKeys)
        {
            if (!key.Contains("_"))
                continue;

            string[] components = key.Split("_".ToCharArray());

            if (components.Length == 2 &&
                int.TryParse(components[0], out int row) &&
                int.TryParse(components[1], out int col))
                array[row][col].Value = this.FormCollection.GetValue(key).AttemptedValue;
        }
    }

    return array;
}
View Model Validation
Because we are unable to use DataAnnotations attributes for validation on our 2D structure, we will want to specify our view model as implementing IValidatableObject so that we can interact with the ASP.NET MVC ModelState for managing properties and errors. In this way, if a particular value for a cell has a validation error, we can still use the ModelState to track errors for the view model and know exactly which cell requires validation messaging. For our example, as we are managing prices, we will want to validate that each combination requires a price, and that it must be a value that is at least greater than zero.
public IEnumerable<ValidationResult> Validate(ValidationContext validationContext)
{
    List<List<Cell>> array = this.GetCellData();

    foreach (List<Cell> colors in array)
    {
        foreach (Cell colorSize in colors)
        {
            if (string.IsNullOrEmpty(colorSize.Value))
            {
                yield return new ValidationResult("Please enter a price.", new string[] { colorSize.Name });
            }
            else
            {
                if (!decimal.TryParse(colorSize.Value, out decimal amount))
                {
                    yield return new ValidationResult("Please enter a valid price.", new string[] { colorSize.Name });
                }
                else
                {
                    if (amount <= 0)
                    {
                        yield return new ValidationResult("Please enter a price greater than 0.", new string[] { colorSize.Name });
                    }
                }
            }
        }
    }

}
Controller Actions
With our view model loading from the data source and from a FormCollection object we are ready to begin creating actions in our controller and views for presentation. We will create new actions on our Controller for the ability to edit the prices with a GET and a POST action. Here we specify the FormCollection as an argument for the EditPrices POST action and we side-load the object to our view model.
public class ProductController : Controller
{
    ...

    [HttpGet]
    public ActionResult EditPrices(long id)
    {
        EditPricesModel model = new EditPricesModel();

        // TODO: Load data from the data source

        return View(model);
    }

    [HttpPost]
    public ActionResult EditPrices(FormCollection formCollection)
    {
        EditPricesModel model = new EditPricesModel() { FormCollection = formCollection };

        this.TryValidateModel(model);

        if (!ModelState.IsValid)
            return View(model);

        // TODO: Save data to the data source

        return View(model);
    }
}
Notice here that we are explicitly telling the controller to validate our model after we have side-loaded the FormCollection and then we check the model state. If you are loading other models in your Controller's action signature, you may be required to clear the model's state before calling Controller.TryValidateModel(object).
Presentation with Validation Messaging
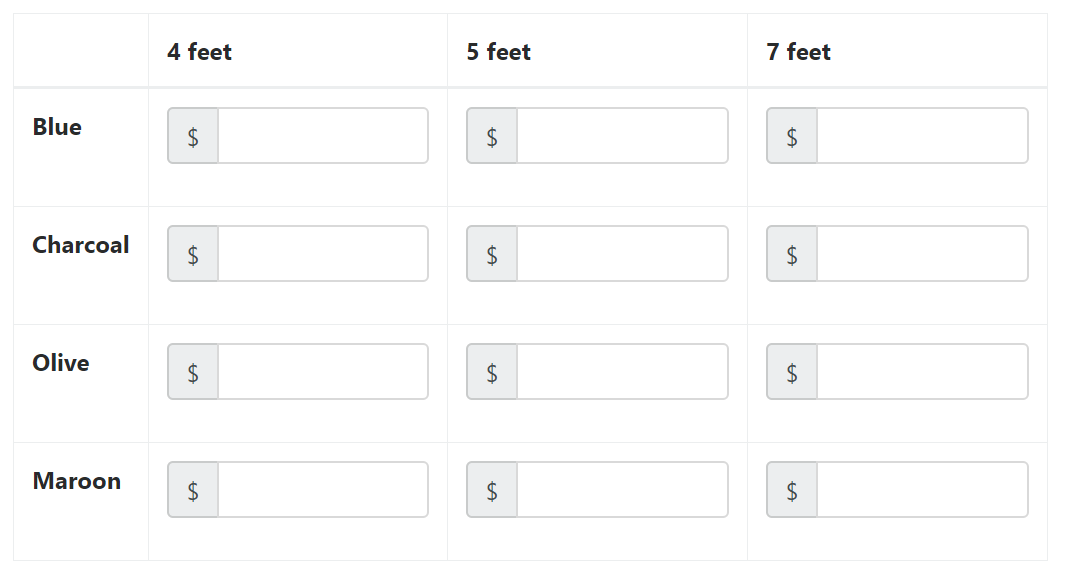
The key here is that the presentation layer needs to iterate over the 2D data structure that contains not only the data but also the validation messaging. In this example, the data for presentation is stored in our view model and the validation state is stored in the ModelStateDictionary as is consistent with the ASP.NET MVC functionality and will interact with any Razor HTML Helpers on the page. Again, because we are in control of the names of the <input> elements on the page it may be easier to simply render the markup manually as opposed to using an HTML helper. Our presentation should create a <table> with <thead> and <tbody> elements for best presentation and accessibility and iterate over the view model data.
<table class="table table-bordered">
    <thead>
        <tr>
            <th></th>
            @foreach (int size in Model.Sizes)
            {
                <th>@size feet</th>
            }
        </tr>
    </thead>
    <tbody>
        @foreach (var color in Model.GetCellData())
        {
            <tr>
                <td style="font-weight:bold;">@(color?[0]?.RowName)</td>
                @foreach (var cell in color)
                {
                    bool hasError = state.ContainsKey(cell.Name) && state[cell.Name].Errors.Count > 0;

                    <td class="@if (hasError) { <text>table-danger</text>}">
                        <div class="form-group">
                            <label for="@cell.Name" class="sr-only" id="@(cell.Name)_label">Price for @cell.ColumnName foot @Model.ProductName in @cell.RowName</label>
                            <div class="input-group">
                                <span class="input-group-addon" id="@(cell.Name)_addon">$</span>
                                <input name="@cell.Name" type="text" value="@cell.Value" class="form-control" aria-describedby="@(cell.Name)_addon" aria-labelledby="@(cell.Name)_label" />
                            </div>
                            @if (hasError)
                            {
                                <div>
                                    @foreach (var errors in state[cell.Name].Errors)
                                    {
                                        <span style="color:red">@errors.ErrorMessage</span>
                                    }
                                </div>
                            }
                        </div>
                    </td>
                }
            </tr>
        }
    </tbody>
</table>
Presentation With Validation
When the page is rendered initially, it may be with data values already or without depending on the data source; the code in latter state will simply render the <input> controls without values. When data is present the controls will render as formatted in the Cell.Value property.
When the form data has validation messages that need to be displayed, the markup will conditionally render the validation messages that were validated in the IValidatableObject.Validate(ValidationContext) method.

Conclusion
In this article, we addressed some of the challenges when presenting the user with dynamic, tabular data that needs to be validated server-side using a Forms-based approach in Microsoft ASP.NET MVC. Model binding 2D structures in MVC is possible, however it presents issues when sending data back to the server and when rendering the markup that contains the information the user needs in order to correct the invalidated data. We can simplify the transmission of the data if we elect to programmatically control the <input> element's name attribute, but this prompts the developer to have to programmatically validate and present validation messaging with the resulting markup. While implementing developers need to perform these extra steps with this approach, it provides better readability and maintainability of the source code in a re-usable structure.